Theatre of Blood Beginners Guide
The Theatre of Blood, also known as ToB for short, is Oldschool Runescape’s second raid. Unlike in the CoX guide or our osrs ToA guide, the boss encounters within ToB are linear, as you progress through-out the raid you will need to complete the same room format to earn your reward at the end. The audience for this osrs guide is complete learners and will provide all the relevant information to help you get your first completion.
It is recommened to complete the A Night at the Theatre quest before starting ToB. To get an understanding of the mechanics involved in the raid at an easier difficulty level.
Learner Gear Setup for ToB
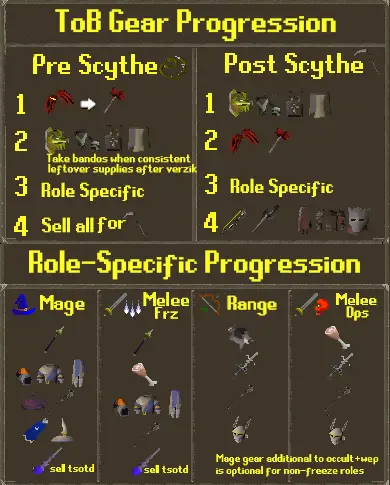
When learning ToB it is recommended to reduce the amount of switches required, this is why elite void is used within the setups. The crossbow is to be used during Verzik Web phase if you are unable to run webs correctly.
Once you get more experience you can remove the crossbow, and focus on melee gear progression. By upgrading to bandos/torva and whip to scythe. This can be seen in the progression chart below. To level faster, players can buy OSRS gold from a trusted seller like PlayerAuctions.

Advanced ToB Gear Setups
Below you can find advanced ToB setups. These are only recommended when you are comfortable with all rooms, usually at around 100+ Kill Count before you progress to these setups. They are tailored to 4 man and so have 4 key roles. If you are focusing on Trio then you can remove the Melee Freeze setup and things stay relatively the same.
Mage
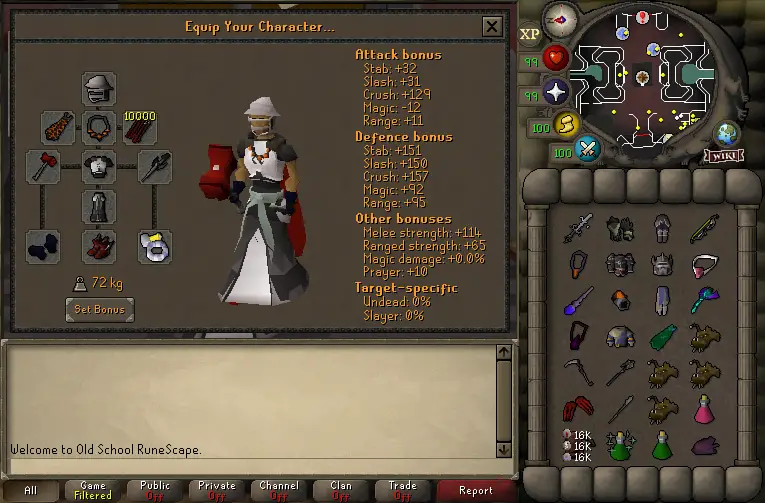
- First additional switch would be ancestral hat if comfortable
- Do not prepot with imbued heart. Keep it for the start of Nylocas. As mage level does not affect max hits on barrages for Maiden anyway.
Melee Freeze
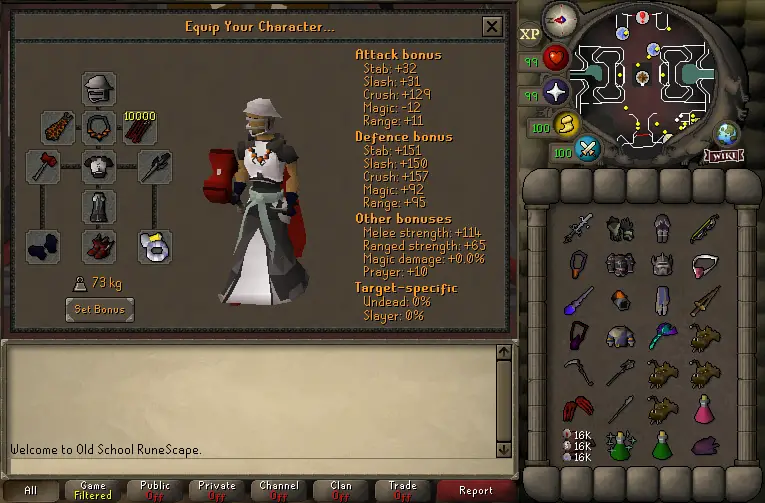
- Do not prepot with imbued heart. Keep it for the start of Nylocas. As mage level does not affect max hits on barrages for Maiden anyway.
- Camp ancestral bottoms at Nylocas waves to make switching easier. Ham joint or swift blade should be on aggressive.
Range DPS
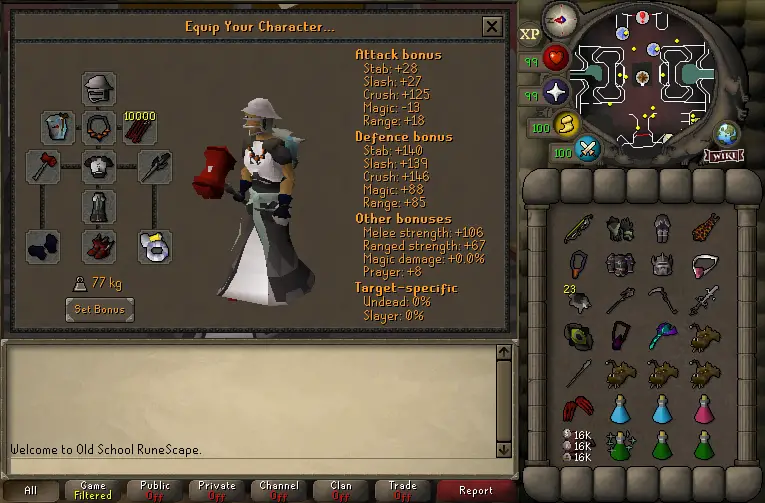
- Bring 20 – 25 black chins per raid. Remember to restock each raid. Any leftovers can be dropped for space after Nylo.
- Buy stamina pot after Bloat and Sotetseg
- Potshare range and stamina pots before Nylocas waves.
- Potshare second range pot before the Nylocas boss spawns (after waves).
- Potshare second stamina pot at p3 verzik for web phase.
- Kill purple crab with blowpipe during p2 verzik. Stay on a separate side to Melee dps role, so you can each pop it based on what side it spawns.
- If comfortable with supplies, thralls can be added. Replace occult with book of the dead. Add cosmic, Law and Blood runes.
Melee DPS
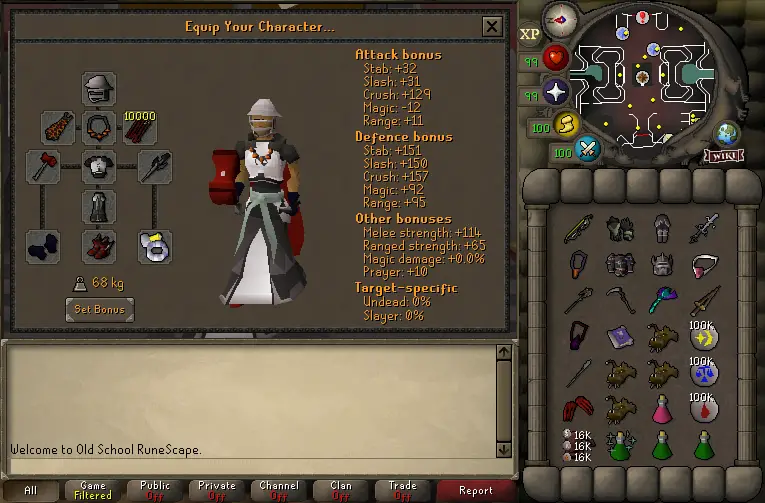
- Camp torva legs for Nylocas waves. Swift blade or ham joint on aggressive.
- Kill purple crab on your side during p2 Verzik. Make sure you are on opposing side to the ranger at p2 start.
- Blood runes can be withdrawn from sang staff if you want an additional space. However, this will likely slow your raid down as you refill and empty the staff between rooms.
Maiden Guide
Maiden will attack the nearest player to her every 10 ticks with a magic based attack. She can drain your stats when she attacks you; which stats are drained is based upon your highest attack bonus. Maiden can throw blood instead of maging, which targets all players in the room on the tile they’re standing on. Blood Spawns are small, roaming creatures that leave a trail of blood on the floor in their wake. They can spawn after maiden throws blood. If a player stands on blood they will take damage and lose prayer every tick. This also heals Maiden.
At 70%, 50% and 30% health spiders will spawn on the north and south sides of the room. They will walk to Maiden, if they reach her they will heal her for twice their remaining HP. Any time Maiden is healed her max hit and the chance for Blood Spawns to appear increases.
Strategy to Kill Maiden
Drop 2 brews outside Maiden. One is so you have space for your avernic defender (or dragon def) when you switch to range, and the other is so you can take off your prims after speccing (as they have negative range/magic attack bonuses and you do not use melee for the rest of the room).
Assign Freezing Roles. The Roles are: N123(4), S124 Tank, and the rest DPS.
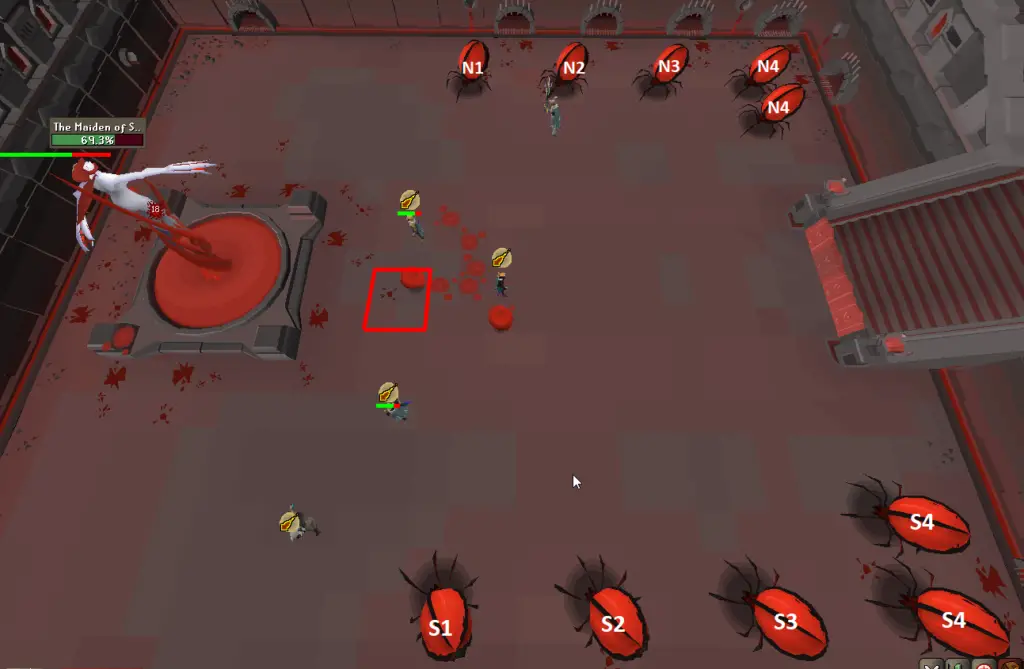
Protect from Magic and run in and DWH/BGS spec Maiden twice. If you are BGS wait until after all the DWH specs before speccing. Switch to range gear, take off prims and attack Maiden. If Maiden throws blood you need to move at least 1-2 tile to dodge it. You should move 1-2 tiles every time Maiden does ANY attack animation to ‘pre-dodge’ potential blood attacks. If Maiden throws extra blood at you you must move 3-4 tiles. If you are standing close to Maiden you MUST pre-dodge every attack otherwise you’ll get hit by the blood attack every time it happens. If any Blood Spawns appear Ice Barrage then kill with blowpipe. Keeping the room clear of Blood Spawns is important.
Before Spiders spawn, the Freezers pre-switch (do at 3-5% above set spawn HP) and wait for DPSers to proc the spawn. N123(4) must have the N1 Spider spawn tile marked as you have a 2 tick window to get the first freeze off, or else you will be too late for 3s. After Spiders spawn, DPS roles blowpipe N1/N2/S1 down then get back on Maiden.
Bloat
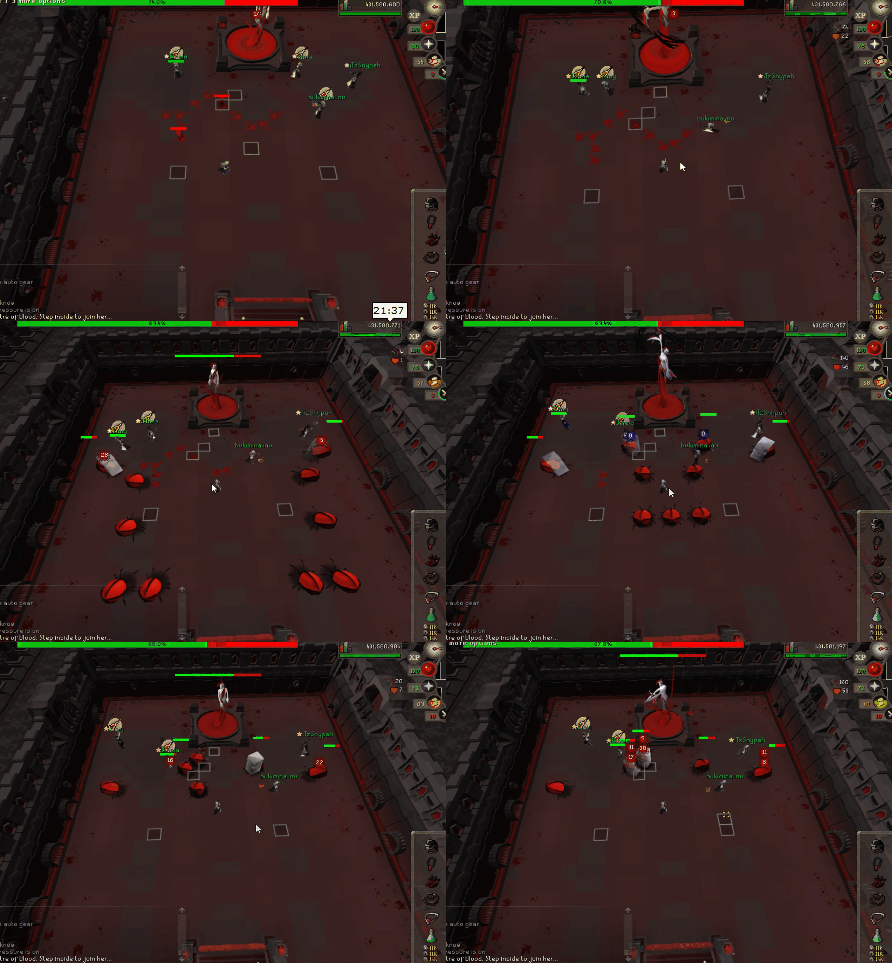
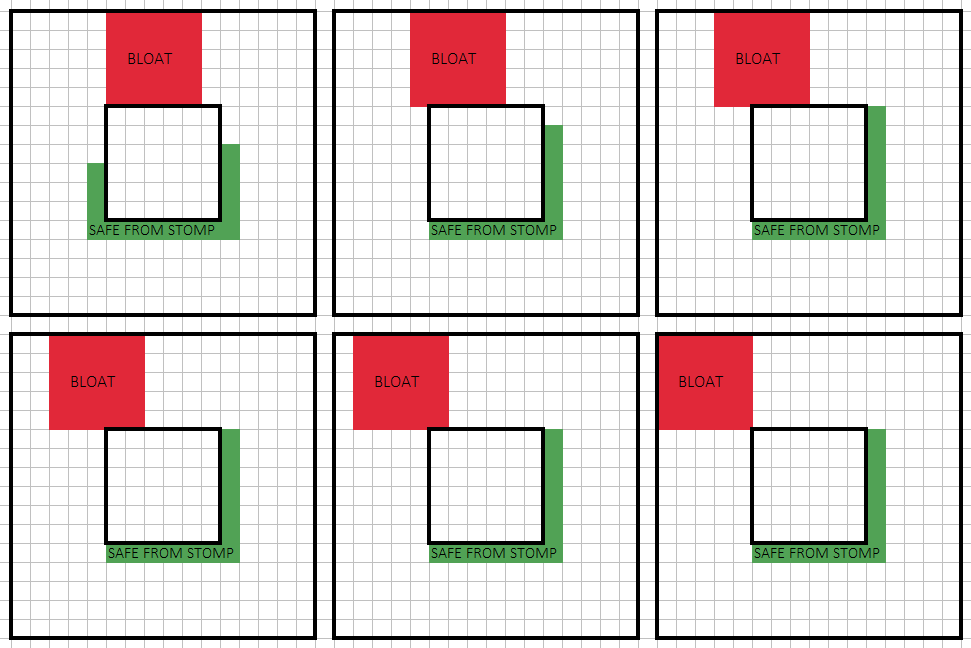
Bloat moves around the pillar in the center of the room. He can change directions. If you are within his line of sight he will fire flies at you. These flies can also bounce off you to other players within your line of sight. After moving around the room Bloat will go to sleep for a period of time. When Bloat wakes up he will stomp the ground, dealing heavy damage to any player in his line of sight. When Bloat is below 90% HP body parts will begin to fall from the ceiling while he is moving. The body parts will appear as shadows on the ground, growing in size before hitting the ground, dealing heavy damage and stunning any player standing on the tile. Body parts cannot fall on the same tile successively. When Bloat is below 60% HP he is eligible to run instead of walking. Bloat can run at two different speeds: jog and sprint.
How to kill Bloat
Before entering the room equip your salve (e). Drop a brew so that you have inventory space to switch to spec weapon. Supercombat after going in. When Bloat is on the opposite side of the pillar, you may enter the room. Turn on Protect from Range and immediately stand against the pillar. At all times when Bloat is moving you want to be against the pillar on the opposite side of the room as him. When Bloat sleeps attack him with melee. You can get 6 whip hits or 5 scythe hits in before you need to run away if you are on time. If you are late, do 1 less hit before running away.
If you do not have claws: Use a chally spec as the last hit on Bloat instead of your whip/scythe. Chally spec should ONLY be used for last hitting.
When Bloat does his Stomp attack you must be at least 5 tiles away from him and must be around a corner of the pillar to not get hit by it. As a general rule it is better to melee Bloat on the side of him which would let you run around a corner in less time. If you have claws: equip them after Bloat’s first sleep phase. Next time Bloat sleeps start off with 2x dragon claw spec (or 1 if you chally spec’d on last hit for the first phase). The reason why you save specs until the second sleep phase is because if Bloat is >60% HP he will always walk.
The Nylocas
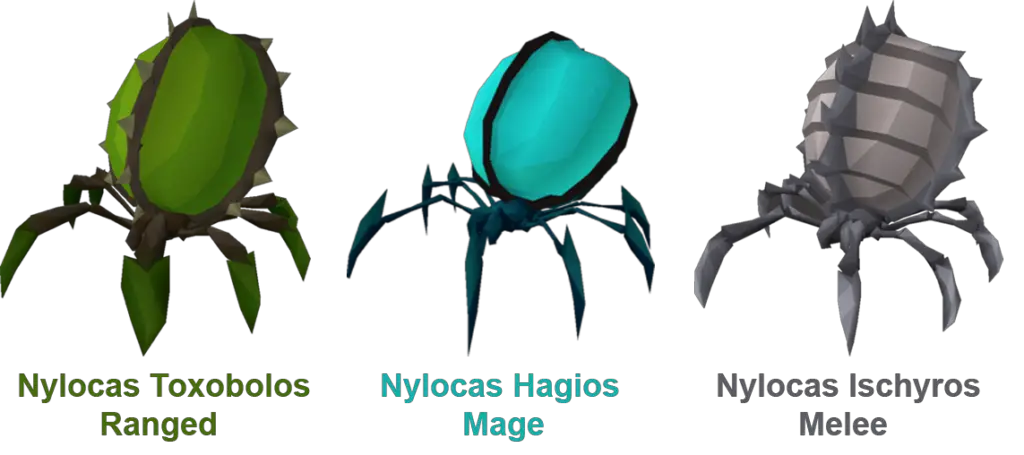
In this room waves of Nylocas will continuously spawn in order, attacking both the pillars and the players. These waves and color changes are always the same, except for 2 random small Nylos that spawn upon death of a large Nylo. The 3 types of Nylos attack with a specific style, and must be attacked with that same combat style to kill them, as shown in the image above. Hitting with the wrong attack style will block your player out from dealing damage to that Nylo again. They can also explode if not killed within a set period of time of entering the room.
At the end of the waves, a boss will spawn that switches between the 3 combat styles randomly (always starts melee). Players must switch to the appropriate style (same as the wave Nylos) to deal damage to the boss, and prayers to defend against it. Hitting with the wrong style here will instead heal the boss for the damage dealt, and recoil it back to you (it will not block your player out from dealing damage).
Nylo Strategy
Each player will be assigned a role to do in this room based on team size, with their main job to kill their respective style of Nylo. The roles will vary with team size: Team Sizes:
- Team of 3; 1 Melee + 1 Ranger + 1 Mager (Nylos have 8 or 16 HP depending on small/large type).
- Team of 4; 2 Melee + 1 Ranger + 1 Mager (Nylos have 9 or 19 HP depending on small/large type).
- Team of 5; 2 Melee + 1 Ranger + 2 Magers (Nylos have 11 or 22 HP depending on small/large type).
Player aggressive Nylos in the middle should be prioritized first, and appropriate defensive overhead prayers to be used as needed. At all times use Piety/Rigour/Augury, it is a common misconception that you should not use offensive prayers. Over time, memorize the spawns/color changes of the waves as they are always the same. Maintain low downtime by readying your cursor on the next Nylo, and click it as soon as you receive an EXP drop that will kill the current target. Your commands are cancelled at color changes and aggression from Nylocas (aggression occurs after they have crossed the entrance line). Beginners can mitigate mistakes during the waves by continuously clicking after they cross the line. Use the previous tip to your advantage during the boss (you will automatically stop attacking the boss when it switches forms).
Melee Role
If there is more than 1 melee role (team sizes 4/5), spread out east/west and prioritize a side (you can help the other side if excess gray Nylos are there). If there are no gray Nylos to kill in the entire room, kill blue Nylos with a trident/sang staff. Do NOT barrage them. During the end waves, a good method to attack gray Nylos on the pillars without taking heavy explosive damage is to move away from the pillars in between your attacks.
Ranger Role
The main focus point of the ranger is to blowpipe as many green nylos as possible without having too much downtime. Players having trouble with this may find it easier to click the next green nylo instead of waiting for the EXP drop. If the first nylocas lives, simply re-target it.
Mage Role
Use the trident/sang staff on any isolated blue Nylocas. Use barrages if they can kill multiple blue Nylocas and switch to melee if there are no blue Nylos alive. At the end waves, there will be a lot of blue Nylos where you can barrage.
When the waves end, sip range pot and supercombat for the boss. You should use Claws or BGS (not DWH or Chally) specs as the boss spawns (it will always be in melee form). Beginners should always switch overheads first and weapons second. Advanced players can pre-switch their gear in preference of Melee/Mage -> Ranged -> Melee.
Sotetseg
Sotetseg attacks with a Magic based orb that, when it hits a player, splits into 2 orbs: 1 Magic and 1 Range, directed at other party members. All Magic orbs are Red while the Range orbs are Black. While in melee distance Sotetseg can attack with melee instead. Protection prayers completely nullify the Magic/Ranged orb. The melee attack is only reduced by 50%. If a player is hit by an orb while not using the correct protection prayer, it will disable protection prayers for a short time. After 10 orb attacks, Sotetseg will launch a large energy ball at one player. This damage can be shared across multiple players by standing within 1 tile of the selected player.
At 66% and 33% HP, Sotetseg will teleport players to the far side of the room to run a maze. He does not attack during this time. One person of the party will be chosen to guide the party through the maze and the rest will follow the guide’s path. The maze guide will be seperated from the party and shown the safe path highlighted in red. The maze guide can walk on any of the squares without taking damage; however will be taking small amounts of damage over time. Once the guide has stepped onto the maze, the tile they are standing on will be highlighted in red for the rest of the party. At the end of the maze is a portal to take the guide back to the party. The rest of the party not chosen must not stand on any maze tile except the safe ones that only the guide can see. If a player stands on an unsafe tile the party will take AoE damage every tick. Once any player not chosen progresses past the third row of the maze, a tornado will spawn at the beginning tile of the maze. This tornado follows the safe maze path at walking speed. If any players are caught by the tornado, it does huge AoE damage to that player and others nearby. After each maze is completed Sotetseg regains most of his defense and resumes attacking.
Sotetseg Strategy
Protect from Magic when you go in. Use 1 DWH/BGS spec at the start and one after each maze. Stand around Sotetseg in melee distance and Melee him. If you have Tbow and at least 1 DWH spec has hit, it is better than a whip (still use in melee distance). Prayer flick the orbs correctly (red = protect mage, black = protect range). It’s useful to watch where each mage orb from Sotetseg goes and how/where it splits to give yourself the most time to switch prayers accordingly. If there is ever a time where you think a mage orb and range orb will hit you on the same tick, protect from magic first and then protect from range the tick after. When Sotetseg launches the large ball of energy, gather (DD) at melee distance south of Sotetseg and DO NOT leave until you see the hit splat from the bomb landing. Spread out quickly after so it is easier to react to any mage/range orbs.
Once teleported for the maze, turn off prayers. Equip your defence lowering spec weapon. The guide steps onto the first tile of the safe path (highlighted in red), waits a little bit, then moves to the third row following the safe path and waits until the party has caught up. It is a good idea to use voice chat to communicate. Once the party is ready, the guide runs maze following the safe path as quickly as possible without sacrificing click accuracy. It is very important to not make pathing errors as they can kill the team near instantly. At the end of the maze, the guide may enter the portal to return to the team. As a follower click on the red highlighted squares in the order they come up. Make sure not to go onto the 4th row of the maze before everyone is ready. It is very important to not make pathing errors (misclicks) as they deal alot of damage to the team. After each maze use 1 DWH/BGS spec.
Before entering Xarpus
After Sotetseg is complete, you will be able to buy supplies from the final supply chest before Verzik.
Drop all your brews/restores that aren’t 4 dose. If you brought in Soul runes, drop those. Sip and drop your ranging potion, it is no longer needed. If you have more than 8 doses of Supercombat, sip and drop the extra doses. If you have less than 3 doses of stamina, drop it and buy a new one. Buy restores until you have 4. If you are going to have 10+ brews, you can buy a 5th restore. Fill the rest of your inventory with brews. Buy these last. If you have any extra points, buy brews and drop them on the floor in case your teammates need them.
Xarpus Room Guide
Xarpus is split into three phases. During Phase one; Exposed exhumed will heal Xarpus over time. Stand on them to prevent this. For phase two; Xarpus will face players based on orb order (top-down) and fire a poison projectile that will land on their current tile. It will also bounce off and create 2 projectiles (these will not bounce) toward the other players. These poison tiles will deal damage if they are ran/skipped over. At around 20-25% HP phase three is triggered. Xarpus will randomly face quadrants of the room, and any players who attack him while in his current line of sight will be hit back for a massive amount of damage. Xarpus turns every 8 ticks in this phase.
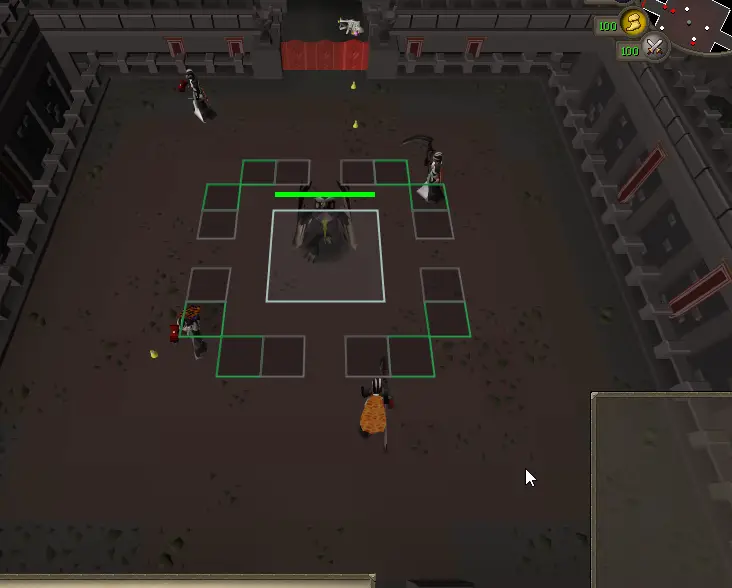
The 8 green tile markers show where you should stand for the end of P1/beginning of P2. The 8 gray tile markers will assist you in navigating around Xarpus for P3 greatly. Do not stand on the gray tiles during P2. This room does not require supplies to be used, other than offensive boosts which can be used at the previous Sotetseg chest.
Phase 1; Exhumes
Spread out across the room to minimize the time needed to reach an exhumed. Only one player needs to be standing on an exhumed to block it. Once all exhumed has faded away, prepare for P2 by equipping your DWH/BGS and standing on the green tiles. Do not stand on the gray tiles or between two of them.
Phase 2; Pre-screech
Use your defence lowering special attacks. Save BGS specs until after all DWH specs have been used. Then, run to different corners of the room and blowpipe (tbow is better if less than 4 specs hit). Move two tiles away from your current position only when Xarpus turns to face you. Bouncing projectiles will not reach you in time, and this method will prevent you from spreading additional poison. In trios, additionally avoid returning back to tiles adjacent to your previous position. After Xarpus screeches at 20-25% HP, stop attacking. Stand on any of the 8 gray tiles and prepare for P3.
Phase 3; Post-screech
Navigate around Xarpus using the 8 tiles in a circular motion, and attack Xarpus only when he is not facing your quadrant. Beginners should be very cautious with their timing in this phase. It is recommended to stand still and wait until Xarpus is not looking at you. Advanced players can move to where he’s already facing in anticipation of his turn to maximize your DPS, since he will not stare at the same quadrant twice in a row. Depending on weapon of choice, you can deal maximum DPS based on the attack cycles below:
- Basic: Whip/Rapier – 2 hits per turn
- Advanced: Blowpipe – 4 hits per turn (move between each attack)
- Advanced: Scythe/Tbow – [2-2-1-2-1] cycle, starting if you hit on the same tick he turns
Before going into Verzik ensure that somebody picks up the Dawnbringer staff outside.
Verzik Guide
Phase One Mechanics
Verzik attacks players using a magic attack. If you’re behind a pillar, Verzik will instead target the pillar. She takes significantly reduced damage from normal attacks. The Dawnbringer special attack hits hard against Verzik. When Pillars fall, anybody standing in melee distance will be stunned and take heavy damage. When she reaches 0% HP, the remaining standing pillars will fall and Verzik will move to the center of the room. Defence reduction specs do not work against any phase of Verzik.
How to complete p1 Verzik
Drop a minimum of 2 brews on the outside of the pillars so that you have space to pick up Dawnbringer when it is your time to spec. Give the Dawnbringer to the person at the top of the orb order (in the top left of screen). You will be passing around Dawnbringer in orb order starting from the top. DD in melee distance with melee gear on at the start. The person with Dawnbringer should be wielding it preparing to spec 2x at the start. Put on Protect from Magic, no other prayer. Leave this prayer on for the entirety of P1. DO NOT turn it off for any reason. Spam click the boss. The person with the Dawnbringer will be the one to start the boss. You can get 4 hits in at the beginning before needing to run behind the NW Pillar.
The person starting will 2x Dawnbringer spec then drop the Dawnbringer at the boss, then attack it twice with melee before running behind NW Pillar. The second person at the start will 2x melee hit, pick up Dawnbringer, spec 1x in melee distance, move back toward NW Pillar and spec a second time before dropping Dawnbringer behind Pillar at the safespot. From here onward, Dawnbringer should only be dropped/picked up at the pillar safespots marked below.
Use the gray tiles for dropping/picking up Dawnbringer. The red tiles are safe from both Verzik’s magic attacks and from the Pillar falling damage.The Visual cue to when you can attack Verzik from behind the Pillar is when she spreads her legs or when she claps. After Verzik starts attacking you can only get 2 melee hits or 3 mage hits in before needing to get behind pillar. Melee is significantly better: a single whip hit deals more damage than 3 trident/sang hits. On the hit that the NW Pillar would die, the entire team runs East to the NE Pillar. When the NE Pillar dies, the team moves to the Middle East Pillar. If the Middle East Pillar dies the team moves to the Middle West Pillar. This method is known as 1-1-2-2.
Keep passing the Dawnbringer around in orb order doing specs. Once everybody has done 2 specs, the orb order loops around and starts at the top for the second set of specs. Everybody does 1 more spec. If Verzik is not at 0% by the time everybody has used their specs, you may use the Dawnbringer to auto attack. Once Verzik is at 0%, get away from the pillars immediately. Move to the center of the room. P2 will begin shortly.
Phase Two Mechanics
For both P2 and P3, Verzik is weak to slash. Every 4 ticks, Verzik will check to see if any players are under her/in melee distance. If a player meets that condition, she has a high chance to bounce them outwards, dealing damage and stunning them temporarily. If no players are in melee distance during this tick, she will usually throw a 1×1 ranged attack (prayer halves this damage) that will target every player’s current position.
Verzik can also throw a blue lightning attack (occurs every 5 attacks) that can bounce a total of 4 times between players before dealing 50 damage to the last contacted player. If this attack passes directly through Verzik it will be negated. If a player is too far away from their teammates, the attack will simply deal 50 damage without bouncing. Periodically, Verzik can spawn both a set of explosive Nylocas (number of Nylos dependent on team size) and a purple Nylocas that does not move. The purple Nylocas will deal damage to players under its spawn point, and must be attacked with a poison-type weapon (tent whip/swamp trident ideally) to prevent it from healing Verzik. The explosive nylocas will detonate upon close proximity to its targetted player, dealing damage based on distance.
At 35% HP, Verzik will stop spawning the explosive and purple Nylos. Instead, she will spawn two red Nylocas periodically. After a set amount of time, these two will heal Verzik on a 1:1 ratio of their HP. During this phase, Verzik will mainly use magic attacks that can be fully negated with Protect From Magic. These attacks will drain your prayer. She can still throw her previous ranged attacks sometimes. While spawning her sets of red Nylocas, Verzik will briefly stop attacking and any attacks dealt to her will instead heal her.
p2 Verzik Strategy
You will be using melee almost entirely from this point onward. You must be supercombatted at all times. Use a 4 tick rhythm that both keeps your player out of melee distance on her 4th tick, and dodges her ranged attack. Beginners are advised to keep their HP high and pray ranged until 35%. Try to keep a symmetrical formation (usually 2 east, 2 west) to increase your team’s chance of negating the lightning attack.
Prioritize avoiding the explosive Nylo spawns by first moving away from them. Ice Barrage them to hold them in place afterwards. Stay at a minimum of 4-5 tiles away from them. She cannot spawn the explosive Nylocas if the purple Nylo is not poisoned. Beginner teams learning the P2 rhythm may find it helpful to leave it alive before 35% to practice, but it will make the phase longer.
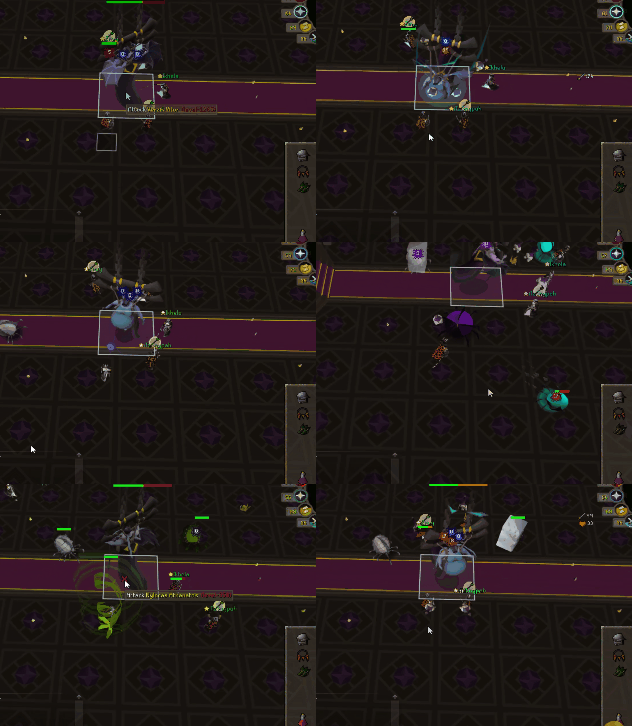
At 35%, protect from magic to negate her magic attacks. Move in between hits to dodge her ranged attacks. Kill or lower the red Nylos to below ~10% HP before attacking Verzik with the same 4 tick rhythm as before. If you attack prior to Verzik’s pause/heal, you can get one additional hit on Verzik before her next set spawns.
You can use a Verzik p2 training app here; https://lmperium2096.github.io/verzik_trainer/index.html
Phase 3 Mechanics
Verzik will select a random player to target, and attack every 7 ticks (above 20% HP) with ranged, mage, and melee attacks. The ranged and mage attacks will hit all players. The melee attack hits all players around her. The melee attack can be entirely avoided if the targetted player is not within melee distance (below or away from her) 1 tick before her attack. If the targetted player is out of melee distance for an extended period of time, she will switch to a different player. The ranged and mage attacks can be prayed against before they reach you. Protection prayers will reduce 50% of the damage taken.
During P3, Verzik has four different types of special attacks. These will occur after every 4 basic attacks, in the following order:
Nylocas
Identical to Phase 2: stay far away from them and freeze them before continuing to melee the boss. Unlike Phase 2, there will not be a purple Nylo.
Webs
Verzik walks to the center of the room and begins to fire webs. The webs will root players in place if stood on. The webs have 7-11 HP dependent on team size, and can be attacked (ideally with a trident or ice barrage) to free a stuck player. The webs have a set amount of time before they disappear, and will persist 1 tick even after they have visually dissappeared. If a player is not freed in time, they will take a large amount of damage.
Yellows
Verzik will become invulnerable. Yellow pools will spawn on the map – one per player. Each person must stand on a different yellow pool to shield themselves from an incoming attack (can hit up to 80).
Bomb
Verzik will target one random player to fire a green bomb at. This will deal 75% of their maximum HP. It can be, but is not usually bounced to another player by standing within a 3×3 of them. An incorrectly bounced bomb will deal more damage to the team overall.
Purple Tornadoes
At 20% HP, Verzik will spawn 1 purple tornado per player. The tornado follows a specific player at walking speed. If a player is hit by the tornado, it will deal 50% of current health as damage and it will heal Verzik for a considerable amount. A player can only be hit by their own tornado – not their teammates’. She will start attacking every 5 ticks during this phase. Since she attacks every 5 ticks, her cycle of special attacks occurs at a faster rate.
P3 Verzik Strategy
The player targetted by Verzik is assigned as the tank. Non-tanking players may simply attack the boss with melee and pray accordingly. The designated tank should wait under or away from Verzik until after she does a mage/range attack. Attack once with melee before immediately going back under or away from her. Repeat this to prevent meleeing your other teammates.
Specials
At web phase, beginners should use non-melee weapons and attack her from far away (Tbow > Ruby Bolt Crossbow > Trident). Try to stay on the outskirts of the room so as to not disrupt any teammates who are meleeing during webs. Continually move clockwise to dodge the incoming webs, and beware of stepping on a teammate’s web. Return to melee after web phase ends.
While you’re running and standing on yellows, brew up to above full HP to prepare for the bomb. Regardless of team size or skill, most teams choose to simply tank the green bomb without bouncing it to other players. Ensure that everyone on the team has above 80 HP before this attack.
Avoid getting caught by a purple tornado at all costs. It is best advised to lower Verzik below 20% HP after yellows. If you have not brought Verzik below 20% by the time Nylos spawn, it is best advised to wait until yellows occur again. After purples have spawned, use your high damage special attacks to finish the fight as quickly as possible. If tornados are chasing you during yellow pools, it is advised to tank the 80 damage from yellows instead of risking a heal from the tornado.
