ToA Guide OSRS for Beginners
Tombs of Amascut, also known as ToA, is the third raid to be released in Oldschool Runescape. Following on from the success of its predecessors; raids 1 and raids 2. For every raid you will be required to complete 4 Demi-boss rooms before advancing to the 5th and Final boss. These rooms can be done in any order, each room will contain one puzzle you must complete before advancing to fight the demi-boss.
The raid also features invocations, these are additional challenges that make the raid more difficult but also increase the probability of loot. Invocations include factors such as speed, supply restraints, additional mechanics and more. We will provide a more detailed discussion of each invocation later on in this guide.
ToA Gear Setups
Below are a range of recommended setups based on affordability for the best osrs ToA gear.
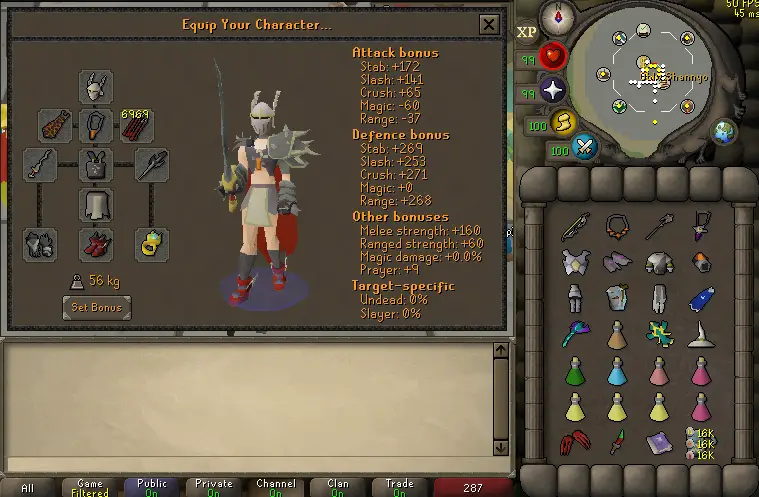
Maxed Setup

Estimated cost around 5.7b.
In terms of DPS-per-GP upgrades, aim to buy in this order: ZCB -> Shadow -> Masori -> Torva.

 Works for both Normal and Expert Mode raids (can bank helmet switches for Experts if you are still learning).
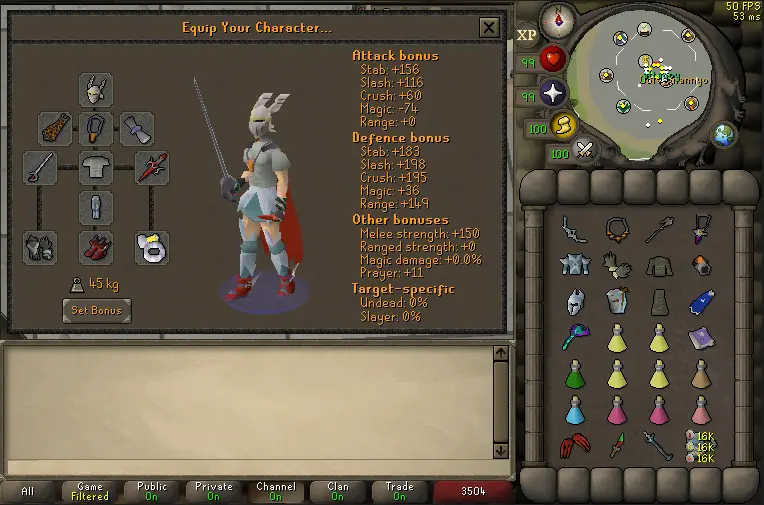
High Tier Setup
Estimated cost is around 2.3b
Osmumtens Fang is a massive upgrade, buy it first if you can. Lightbearer is a great, cheap upgrade. Tbow is also a huge upgrade, but costs a small fortune. A fang + tbow rebuild is worth considering if you plan to camp ToA.
If you plan to learn Expert Mode raids, consider banking MA2 cape and Ancestral hat for an extra brew and restore.
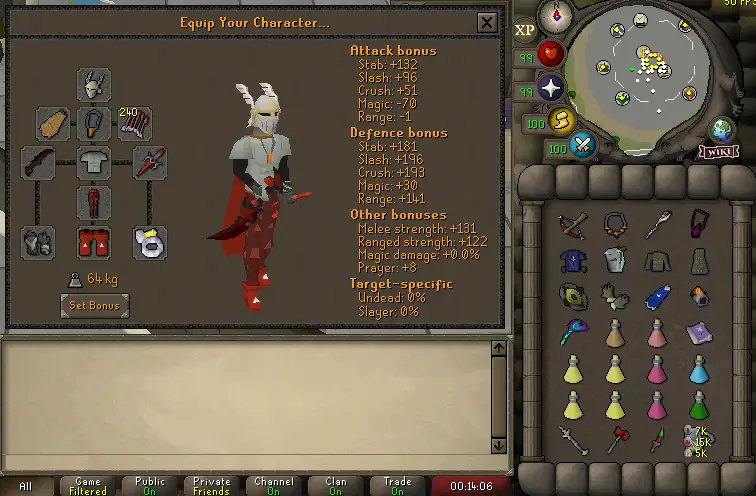
Core Gear Setup
Estimated Cost is around 850m. This toa gear setup has a big budget spike over the previous, upgrading core items for all 3 attack styles (Rapier > Bofa > Sang).
Dragon Claws are a great spec weapon if you are not the BGS/DWH/Corruptor for your team. If you do not have a Partisan of breaching already, bring another potion and use Rapier on Kephri.
Welfare ToA Setup
Estimated Cost is around 150m. This setup will allow players to comfortably do normal ToA runs.
ToA Gear Progression
Below you can see a chart that shows you the specific route to follow when upgrading your ToA Gear Setups in OSRS. Helping you to make efficient use of your GP to get the best possible gear upgrades for more efficient raiding.

How to get to ToA OSRS?
Raids 3 is located in Necropolis, within the black Pyramid. The fasted method of transportation there is:
- Using the Pharaoh’s Sceptre to Teleport to Jaltevas. For this you must have already used the Sceptre on the obelisk north of the mine in Necropolis.
- Fairy rings code: A-K-P and running east. This method requires 62 Agility.
Alternative (slower) methods include:
- Nardah teleport and run south-west.
- Magic carpet ride from the Shantay Pass to Pollniveach. Run south and ride a second carpet to Sophanem. Then run south-east. If you have level 99 construction or max cape then you can teleport directly to Pollniveach.
It is worth noting, to gain access to this area, completion of the Beneath Cursed Sands quest is necessary.

ToA Room Resources
Below is a OSRS ToA guide for all of the raids rooms. Including a breakdown of each demi-boss, puzzles and the final boss.

Akkha
Akkha is the Guardian of Het and a Humanoid. To fight him you must first complete the Path of Het.
Path of Het
Pickaxe matters, you can bring in a dragon pickaxe and deposit it forever. Bounce light from mirrors to hit the shield minion. Once the light hits the statue, you can attack the obelisk in the middle. This should take 1 phase with (85 mining level and a dragon pickaxe). Avoid getting hit by black shadows roaming the floor, being hit by the light will deal a little bit of damage.
Akkha Overview
Akkha prays against 2 styles at once. If he is praying mage/range – Attack him with melee and pray range. If he is praying mage/melee – Attack him with range and pray mage. If he is praying range/melee – Attack with mage and pray melee. Akkha will always start praying range/melee -> mage/range -> range/melee.
If you struggle with prayers, remembering like the image below shows might help.

Attack Akkha with corresponding style untill the guards spawn at the 4 corners of the room. Kill one of them. Once you’ve killed one of the guards, Akkha will ONLY take damage when he is lured into the same corner as the most recently killed guard. He might also lash out at all the other quadrants EXCEPT for the one where you killed the most recent guard (when the hourglass on the wall fills up).
Once you’ve killed all 4 guards, the final phase starts. Ideally you have double claw spec for this phase. Akkha will appear in 1 of the 4 corners of the room, once you deal a threshold amount of damage to him, he will change corner (around 1 scythe swing per person in the raid). Mage pray still works, but is less effective.
Mechanics of Akkha
If Akkha turns your character into a “shadow”, avoid moving, if you move you will leave a trail behind you, if you or someone else walks into it, you take elemental dmg (depending on what quadrant you’re in).
If Akkha turns your character into a “white light”, you will have a beam of light shooting out in a straight line from your character, make sure to spread out.
When Akkha dissapears, one of the 4 icons in the middle of the floor will light up. Then one of the adjacent symbols will also light up. REMEMBER THE ORDER and stand on them in the same order.
The light attacks do not deal damage on the tile you’re standing on, therefore multiple people can DD (stand on the same tile as) to avoid damage (i.e. dd on the tank). This tactic is more usefull if you’re using the “Feeling Special?” invocation.
Akkha Invocations
- Double Trouble: Akkha will do two special attacks at once.
- Keep Back: If you are in melee range, Akkha’s ranged and magic attacks will also do melee damage to you.
- Stay Vigilant: Akkha will switch attack styles and prayers at random.
- Feeling Special: Akkha’s detonate attack triggers in more directions. Memory attack will provide only a two tick time frame to move quadrants. Trailing orbs attack spawns an additional orb, found 2 tiles in front of the player.
In the image below you can see a list of Akkha’s specific invocations, with their corresponding difficulty levels.


Ba-Ba
Ba-Ba is the Guardian of Apmeken. The monkey boss in Tombs of Amascut, below is a toa guide osrs for this boss.
Path of Apmeken
The monkey path contains 1 puzzle before the main boss. To clear this room you must kill all the monkeys.
One person will be chosen with Apmekens blessing, this person will receive extra instructions. The blessing passes on as the room continues. 1/3 Issues will happen:
- Issue with roof supports – fix pillars
- Fumes – Pour potion into vents
- Corruption – DD on a tile and the person with the blessing uses potion on the corrupted player(s) (example tiles can be south/north of the middle pillar, make it clear with your team which tile to DD on).
The room has 4 pillars and 4 vents. If you’re less than 4 players, you only have to take one vent each. With 4 or more players, as long as each pillar/vent is fixed, you won’t take damage (therefore you can have “float” players that help around the room).
- Shamans – Kill them ASAP with BP
- Red monkeys – Kill with mage
- Green – Kill with melee
- Blue – Kill with range
- Acid Monkeys – Mage
- Volatile monkey – Run away once it touches you (it’ll blow up dealing a significant amount of damage to the immidiate adjacent tiles).
Overview of Ba-Ba
After completing the puzzle section of the Monkey path, you’ll be able to face off against Ba-Ba. Ba-Ba is weak to melee, and auto attacks with melee.
When baboons spawn, kill them ASAP, if they open the coffins, falling rocks will appear from them.
Mechanics of Ba-Ba
Ba-Ba has 5 mechanics to look out for, these appear Mechanic 1 – Rolling Boulders: Throws everyone to the back of the room – break the weakest looking one – TBow max distance with rigour as a team is enough. Alternatively you can run past the boulders and attack Ba-Ba. This will “skip” the phase.
Mechanic 2 – Boulders on the floor: After a little while he will throw boulders at you, run adjacent to the big rock piles to avoid damage. Ff multiple people, split evenly at boulders (if not they break and you take 40+). The boulders have a combined HP enough to tank for everyone. If you have an odd amount off people, make sure to split the majority to the full hp boulder.
- Falling rocks – Move away from the shadows (hits 2-3 ticks after first appearance)
- Shadows on the ground – Creates a 5×5 shadows, run away from them
- Baboons spawning – Baboons that will either attack the player, or the sarcophaguses along the north/south side of the room. Ideally kill them when they spawn, however they will die to the rolling boulders, if close to 66% or 33% you can ignore them.
Ba-Ba Invocations
- Mind the Gap: At 66% and 33% health, when ba-ba knocks players back to the bottom of the room. If the player is standing in the middle of the room, they will be pushed down into the pit and die. To avoid death, stand at the north/south sides of the room.
- Gotta have Faith: Energy blasts that come from open sarcophagi in the room will deal bonus damage based on the players prayer points.
- Jungle Japes: Ba-Ba’s baboons when killed will drop a banana peel on the floor. If you stand on it you will be stunned for 3 seconds and take a small amount of damage.
- Shaking things up: Ba-Ba’s slam attack will create a larger shockwave, damaging a bigger area.
- Boulderdash: Ba-Ba’s boulders will spawn at a faster rate.
In the image below you can see a list of Ba-Ba’s specific invocations, with their corresponding difficulty levels.


Zebak
Zebak is the Guardian of Crondis. He is also known as the Croc demi-boss in Tombs of Amascut. Below is an efficient toa osrs guide for this boss.
Path of Crondis
Pick up a Water container from the sides of the central room. Run through 1 of the 4 corridors and collect water from the waterfall. Dodge the spike traps and poison trails.
Taking damage will reduce the amount of water in your container. Deliver water to the Palm to heal it and repeat the process.
Crocodiles will eventually spawn and attempt to eat from the Palm of Resourcefulness, reducing its HP. Assign 1 player to stay behind and freeze and/or kill them with magic.
Overview of Zebak
After completing the puzzle section of the Crondis path, you’ll be able to face off against Zebak. Use ranged (TBow BIS), pray range against the big boulder and mage against the sand-colored vase (that splits into red orbs).
Mechanics of Zebak
Zebak only has 2 special attacks, each of them starting off with him spitting acid. If during this attack there are boulders located around the room, you must clear the acid 1-3 tiles directly behind the boulder. Push/pull the jugs off water so that they clear the acid. The water jugs can be pushed diagonally, if they hit the boulder they will explode and clear the acid.
If during this attack there are no boulders, waves will spawn on either side of Zebak. There will be gaps in the wall (very similar to Galvek). Make sure to not get hit by the waves.
Zebak Invocations
- Not Just a Head: Zebak will cast a blood blitz on all players. Always deals damage unless protect from magic is active. Also summons blood clouds that deal rapid damage if standing nearby.
- Arterial Spray: Blood magic spell will have increased range and healing. Not just a head must be active to unlock this invocation.
- Blood Thinners: Three blood clouds instead of one. Not just a head must be active to unlock this invocation.
- Upset Stomach: Increased spread for Zebak’s acid pools and jugs are less effective (3×3 area instead of 5×5)
In the image below you can see a list of Zebak specific invocations, with their corresponding difficulty levels.


Kephri
Kephri is the Guardian of Scabaras and is also known as the Scarab boss in ToA.
Path of Scabaras
The Path of Scabaras contains 5 puzzles before the main boss. If you’re not soloing, you can split up.
Memory Puzzle
Press the button to reveal a sequence of 5 tiles. Step on the tiles in the order they light up. If you fail, press the button again for a new sequence.
Pillar Puzzle
This is a test of trial-and-error that requires hitting all 6 pillars in an unknown order. A pillar lights up when it is attacked in the right place in the order. Remember the correct order up until you fail, then try again with a different pillar. When you fail, dodge the boulders that fall from the ceiling.
Light Puzzle
There are 8 tiles, some of which will randomly be lit up. The objective is to light up all 8 tiles. Stepping onto a tile will change the light (turn on if it was off / turn off it was on) and does the same to its 2 adjacent tiles.
Number Puzzle
Read the tablet to reveal a random number from 20-45. The symbols on the grid correlate to numbers 1-9.

Number Puzzle Solutions

Final Puzzle
The final puzzle requires revealing tiles with symbols in both routes until they match. Communicate with your team – have a player in one route reveal each tile one by one, while players in the other route try to find the symbol to match it. In a solo, you will have to do this by yourself, but you can move between both routes and there are fewer tiles to reveal.
Overview of Kephri
Kephri has 3 shield phases, followed by his final phase. After destroying his shield, scarab minions will spawn. There will also be a short downtime where your goal is to kill the scarab minions and prevent as many of the scarab swarms to get to the boss (they recharge the shield). You will always 1 shot them (hit high (possibly max hit)). During this phase, the boss will not attack either, instead there will come flying scarabs that detonate, exactly like the fireballs.
The first time his displayed hp hits 0, a range scarab will spawn. Pray range, and kill the range minion. It seems either tbow or melee weapon is fine to kill the range minion. As for the melee minion it seems that all weapons are ok on it.
The second time an Arcane scarab and melee scarab will spawn. Kill the arcane scarab ASAP (tbow is very good). The arcane scarab charges up a powerful mage attack (you can pray mage if this goes off to reduce the damage), once you’ve dealt a certain amount of damage the charge-up stops and he teleports across the room. The melee minion is optional whether you kill or not (you can pray melee and ignore him, he will heal the boss slightly, but it is insignificant in high scales).
The third time is the final time. Kephri will knock you back (performing his dung attack (ref: mechanics)). This is the final phase.
Attack Kephri with melee (fang BIS). Kephri does not have an auto-attack, instead he has a projectile he launches. Avoid standing on the shadow as the fireball approaches.
Mechanics of Kephri
Eggs – These explode/spawn agile scarabs. They can easily be ignored (praying range also neutralizes the damage from them 100%).
Dung attack – Players will be surrounded by scarab swarms and after a short delay, will be knocked against the wall, leaving a trail of dung. You can not get past this dung, so make sure to not stuck yourself. It is possible for several people to DD.
Kephri Invocations
- Lively Larvae: During Kephri’s mass incubation phase, the number of brown eggs she launches will increase from 2 to 4.
- More Overlords: An extra scarab is spawned during her shield phase. During the first she spawns an additional Soldier Scarab, the second she spawns an additional Spitting Scarab.
- Blowing Mud: Number of players targeted by Kephri’s dung strike is increased to two. No affect if in a solo raid.
- Medic: Scarab swarms will be summoned outside of her shield healing phase.
- Aerial Assault: Her auto-attack will deal more damage and its attack range increases to a 3×3 area.
In the image below you can see a list of Kephri’s specific invocations, with their corresponding difficulty levels.


The Wardens
The Wardens are the final boss of the Tombs of Amascut. A three-phase bossfight, they emphasis prayer switching and movement, and difficulty can scale up dramatically with selected invocations.
Wardens Fight Overview
In Phase One,, the team must DPS the Obelisk in the middle of the room. The obelisk does not attack directly, but instead sends orbs towards the two Wardens on the East and West sides. When they charge up, they can unleash powerful attacks.
In Phase Two, one Warden awakens, the one that absorbed more orbs during Phase One. The Warden has a variety of attacks that must be successfully prayed against/dodged, and the Obelisk also attacks with ground targeted attacks that must be dodged.
In Phase Three, the other Warden awakens, and transforms the arena. Players must step from side to side to avoid massive un-prayable damage. The Warden is joined by two of the four minibosses, depending on which side was blocked in Phase One. Finally, At 5% HP, the Warden will Enrage. The ground attack cycle is replaced by a lightning AOE targeting tiles around the room. In addition, the floor will crumble away, removing space to dodge and eventually making it almost impossible to survive.
Mechanics of ToA Wardens
Phase One
BGS 30 Damage. Attack with Melee, BP, or Shadow. If the red orbs are not blocked, the Wardens will charge up. Each Warden has two attacks, which they do in order each time they fully charge. The West Warden, Elidinis, spawns Red UFOs and small orbs. To reduce damage from the small orbs, spread out. The East Warden, Tumemken, spawns Yellow UFOs and big orbs.To reduce damage from the big orbs, DD. The Warden that receives the most charge in P1 determines which two minibosses you tank in P3. See below.
Phase Two
Attack with mage or Range. One Warden will now turn into a moving NPC. The Warden will only be vulnerable to one of either Mage or Range. The West Warden begins praying Range, while the East Warden begins praying Mage. The Warden has several attacks:
- Melee Swing – Melee distance only, pray Melee, kite it
- Beige Skull – pray Range
- Red flashing Skull – pray Mage
- Grey blob – Ground targeted, shadow appears, paralyzes you, dodge it
- Blue orb – Disables prayer, pray Mage
- Red sword – Disables prayer, pray Melee
- White arrow – Disables prayer, pray Range
The Obelisk in the middle also periodically uses the following attacks:
- Windmill red tiles – run counterclockwise to avoid them, or skip over them in the center of the room.
- Line red tiles – these are one wide, skip over them.
- Red skulls – A shadow appears on the floor, when the projectile hits it rapidly deals damage in a 3×3, 5×5, 7×7 area.
Core When you have damaged the Warden enough, the core is exposed. You will always deal your max hit with melee to it, which is multiplied by 5 and hits against the warden’s true HP. See below for detailed information on the Core
Phase Three
BGS 30 Damage. The remaining Warden transforms the battlefield. The Warden attacks one side of the room, then the other, then all but the middle row. Moving between the middle three rows of the room avoids all damage. Attack with Ranged.
At HP thresholds, Warden will spawn red skulls on the floor. These must be attacked with Melee. Any melee weapon will have an attack speed of 1t against them. They have 1hp in smaller scales, and 2hp in larger ones. If not killed on time, Warden does a very large AOE.
At HP thresholds, Warden will spawn minibosses. If you block the East side more during P1, Warden will spawn Zebak, and then Ba-Ba. If you block the West side more during P1, Warden will spawn Akkha, and then Kephri.
Akkha’s attacks are predictable, as he starts with ranged and switches styles after three attacks. Zebak’s are not, he starts with mage and can switch between mage and range randomly, however he doesn’t switch very often. Ba-ba and Kephri both do ground targeted attacks, however if you have Aerial Assault enabled Kephri’s will be a 3×3. Akkha+Kephri is easier to pray against, but Zebak+Ba-ba allows you to enable Aerial Assault for an easy +10 Raid Level. Preference.
At ~5% HP, Warden will enrage. Defense level regenerates, but can be reduced by dwh or bgs by 45. Zone attacks stop, and instead Warden randomly spams lightning on the floor after a delay. Warden will also remove tiles from the arena, starting at the back, which will give you less space to work with and make it harder to dodge.
It’s important to dodge Ba-ba/Kephri, but can be easier to dodge Warden’s lightning if you don’t move too much. A good option is to manually walk on tile, and then another, between every hit, which should avoid most damage.
The Wardens Invocations
- Ancient haste: Wardens charge at a faster rate during the first phase.
- Acceleration: Obelisk charges faster and the Wardens attack faster during the second phase.
- Penetration: Obelisk will deal more damage on successful attacks and disable overhead prayer temporarily during the second phase.
- Overclocked: Slam attack on the final phase is 1 tick faster
- Overclocked 2: Slam attack on the final phase is 2 tick faster. Overlocked must be active to active this invocation.
- Insanity: The following is applied during the final phase:
- Slam attack is 3 ticks faster
- Reduced time to reverse energy siphons
- Slam attack will restart from the place it stopped to launch the energy siphons.
- Red lightning attack strikes faster.
- Floor tiles removed at faster pace.
- (Overlocked 2 must be active for this invocation)
In the image below you can see a list of the Warden’s specific invocations, with their corresponding difficulty levels.

ToA Guide Frequently Asked Questions
Below is a number of different questions that are frequently asked by players who read this OSRS ToA guide.
How hard is Tombs of Amascut?
The difficulty level of ToA can be scaled drastically thanks to its invocation system, making it unique and unlike any other raid. At low invocation levels, the raid can be extremely easy to complete. Adversely, at higher invocation levels, players will begin to find it more challenging. Completing a raid above 500+ invocation level is among one of the most difficult pvm challenges.
Can you get uniques on entry mode TOA?
Yes, unique items can still be obtained from ToA entry mode.
Can you log out during Tombs of Amascut?
Yes, you can log out if you are in a team raid and you will be able to log back in to the instance. However, if you log out during a solo, then you will be ejected from the raid.
What are the odds of a purple chest?
The likelihood of receiving a purple chest in a deathless solo at raid level 300 is around 4.1%. The probability varies greatly depending on scale and invocation level.