The Inferno is the abyss over which the largest skill gap in the game was created. No PvM you’ve done before will even come close to the challenges that await you here. Whether it be a couple of days, weeks, or even months, the road to your infernal cape is going to be paved with your blood, sweat, and tears. No amount of tips and tricks will get the cape for you – it’s your own decision to make and only your own determination will push you through to the end. That said, players can give themselves a quick boost by choosing to buy OSRS gold.
That being said, literally anyone can get an infernal cape. It’s hard, it’s not impossible, especially not with the help of OSRS Guides. No matter what kind of stigma you have or what others have told you, everybody is capable of getting their own cape as long as they take the right steps towards improvement. And a good start is by being informed – knowing as much as you can is extremely valuable for your attempts.
Time is precious. This guide is designed to help you obtain a cape as quickly as possible. Allowing you access to the best in slot cape for PVM such as CoX and ToB. This will include the best methods for learning and attempt to provide you with every single advantage you can get. This isn’t a perfect guide – not everybody will take away from it the same, but every learner should be as informed as they can possibly be.
This guide is focused entirely on a first cape. Speedruns, limited account builds and other inferno challenges (no pillar, no ancients, etc.) are not included here. On one last note, if any of the GIFs aren’t playing properly on discord, open the link. (edited)
With that out of the way, I hope you like reading. Let’s begin.
Recommended Levels
Before starting the Inferno it’s recommended to have at least:
- 99 Range
- 97 Magic
- 85 Defence
- 77 Prayer (Rigour and Augury)
Gear Setups
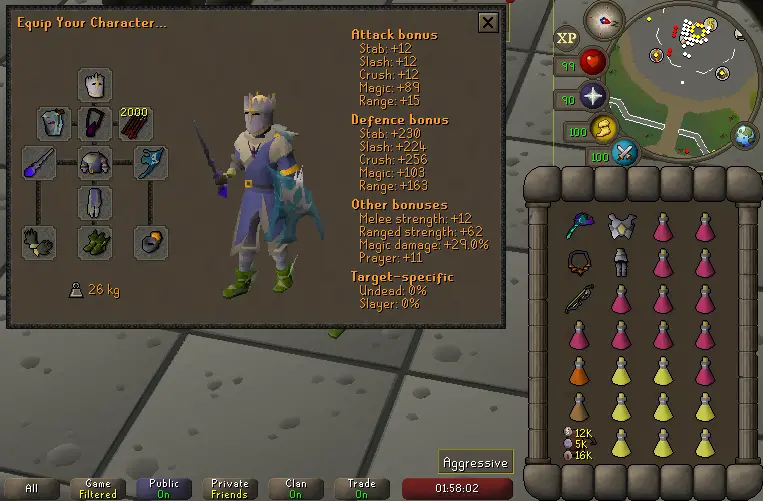
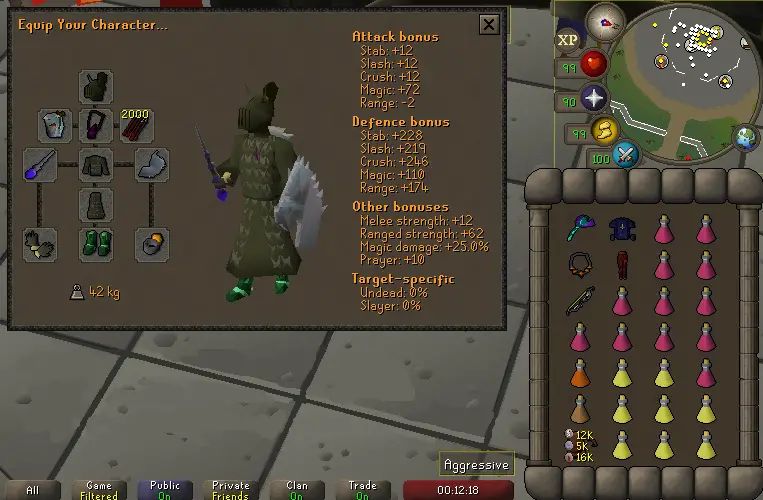
Below you can find some recommended gear setups for inferno.
Max Tbow Setup
Min Bow Setup
General Notes for Inferno Beginners

 Your brew to restore ratio will fix itself. The more attempts you do, the easier it will become to find what best suits you – there’s no need to try and find a perfect ratio when you’re getting started.
 You can take a 2nd bastion potion if you consistently make it to Zuk with supplies (optional on bow capes, highly recommended for ACB capes).
 Use Amythest darts. You can use dragon darts if you consistently make it to Zuk.

 Crystal armor may be used instead of Armadyl/D’hides (if you can afford it). It has higher ranged defence and prayer bonus, only sacrificing a small amount of ranged accuracy.

 Bandos chestplate or Justiciar can be used instead of Ancestral/Ahrims. This will help in making mistakes less punishing as you will take considerably less damage when you mess up. Do not use Justiciar as a method of bruteforcing. You will only cripple yourself by refusing to learn the Inferno.
 Saradomin Godsword may be taken in place of a restore. I would only recommend taking it after you have made it to Zuk twice, when conserving supplies actually matters. While learning, it’s better to use as many supplies as you can.
 Bring a Falador Shield 4 in place of a restore if you have it.
 If using a master wand, or any other alternative to the Kodai Wand, remember to bring water runes in your inventory. However, I wouldn’t recommend attempting the Inferno for the first time with gear below the ACB setup.
Inferno Preparation
Tile Markers
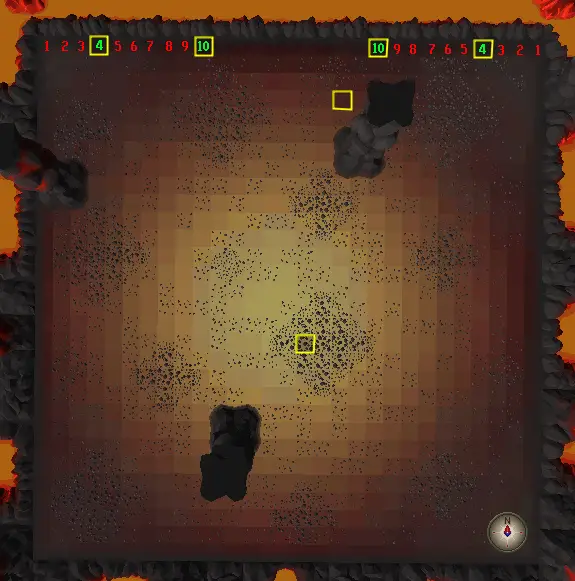
Mark the relevant tiles as shown in the image.
- The four green numbered tiles are the Zuk safespots. Count tiles to make sure they’re correct.
- The lone northern tile works as a reference point for several useful tiles:
- It is a meleer safespot.
- One tile south of it is the starting tile.
- One tile west of it is a bat safespot.
- The lone center tile is a triple Jads standing tile. You are free to mark as many tiles as you like, or none at all.
Prepotting
Before you start your run, go to the bank in Mor Ul Rek. Check charges on all of your items, as well as runes/ammo and set your autocast to Blood Barrage.
Prepot on heart (if you have), angler, bastion pot and stam pot. 


- Items dropped in the Inferno will not despawn for approximately 3 hours.
- Drop a potion at the pillar to equip BP, but don’t forget to pick it back up before logging out.
Monster Breakdown
As you’re probably aware, in the Inferno you’ll have to make your way through waves of monsters similar to the fight caves. Most of these mobs have unique properties that you’ll have to know in order to defeat them. Let’s go over them.
Nibblers
- Three of these will spawn on almost every single wave.
- They’re going to target one of the three pillars at random, slowly chipping away at its health.
Bats
- Bats will attack with ranged over a very short distance.
- They drain your run energy with each hit.
- They drain your stats with each successful hit.
- They attack every 3 ticks, the fastest of any monster in the Inferno.
- Max hit is 19, however may increase after draining stats.
Blobs
Blobs are the most versatile of the Inferno mobs, and the Inferno will feel much more doable after you’ve mastered them. Knowing its mechanics like the back of your hand is fundamental to success.
- They will attack with either mage or range, unless you’re in close proximity in which case they may also melee.
- They have a unique attack pattern: after coming into line of sight with a blob, your prayer is checked on the first tick to see if it’s mage or range. The attack itself then happens on the fourth tick (3 ticks later), with the opposite style of what you prayed against. They will then read your prayer again three ticks afterwards, and repeat the pattern.
- Max hit is 29.
- After a blob dies, three bloblets will spawn in its place.
- Each one attacks with a different style and deals up to 18 damage.
Meleer
 Attacks with melee, hence its name.
 - Meleers have the ability to dig to a spot within melee range of you after they’ve been out of combat for a while.
- Max hit is 49.
Ranger
 Attacks with range, hence its name.
 - Max hit is 46.
- If you are in melee distance, it can also melee you.
Mager
 Attacks with mage, hence its name.
 - Max hit is 70.
- If you are in melee distance, it can also melee you.
- They have the ability to respawn mobs you’ve killed before in the wave. Each mob can only be respawned once, and it will be at half health. The respawn will always happen within a small area south of the north pillar.
- This is the only non-boss monster you should use Tbow on. BP everything else.
Essential Skills
There are three essential skills you should master on the road to your infernal cape. Not learning them is going to cost you an unearthly amount of wasted time. While these can be practiced outside of the Inferno, you will get a lot of experience simply from trying to do these things while you’re inside the Inferno.
You are expected to know what a game tick is and have some form of previous experience with tick manipulation. If you do not understand how game ticks in OSRS work, you should do some research on it and apply practice to other areas before attempting the Inferno.
One Tick Flicking
NOTE: Listening to game sounds is incredibly helpful for learning and using flicking techniques. Highly recommend you turn them on.
One tick flicking is a prayer manipulation method that allows you to maintain your prayers up without using prayer points, either a single one or both overheads + offensives with your quick prayers. You must first click to turn on your prayer, and then double-click every tick after that to keep it active without losing prayer points.
One Tick Alternating or Two Tick Alternating
One tick alternating is your bread and butter solution for any wave with a blob in it – which is a lot of them. This method is foolproof against a single blob, double blob, blob + ranger and blob + mager. You will never take any damage in these situations if you execute it correctly.
- Switch your prayer from mage-range or range-mage every tick.
- If you’re dealing with a ranger or a mager, make sure you pray against it on the first tick, then begin alternating.
Waves Starting Position
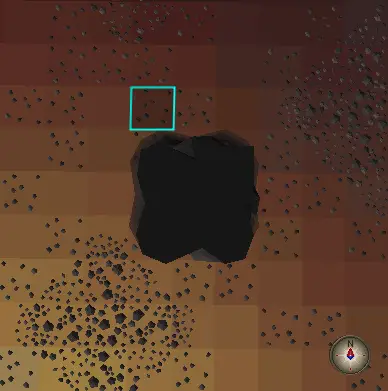
The Inferno consists of 69 total waves, with 67, 68 and 69 being the boss fights against Jad, triple Jads and Zuk. The first 66 waves will pit you up against several mobs from which you can only safespot at three different pillars.
The only important pillar is the north one, as it’s going to be your starting point in every wave, and there are fewer possible spawns on the north side of the inferno, making it so that all waves can be solved using this pillar alone.
Solving spawns is possibly the hardest part of the inferno. Master this, and you’re golden. At the start of every wave, start with your mage gear equipped and get ready to throw an ice barrage on the spawn of nibblers. Stand on this tile by the north pillar. It will allow you to drag yourself out after casting your ice barrage if you need it, and you can spam click the tile in order to prevent the drag.
OSRS Inferno Wave Stack Solutions
Below will cover a range of different solutions to monsters you may find stacked behind your northern pillar after the start of a wave. These solutions are for mob stacks south of the pillar, although the same principle applies if they are stacked west of the pillar as well.
Ranger / Mager + Blob
Simple one tick or two tick alternation is all that is required for this stack.
Ranger + Mager
- Works for mager + ranger as well.
- Step on the middle tile north of the pillar.
- Either click to attack the back monster or manually move out westwards.
- They will be off-ticked, pray against the back monster first, then switch prayer for the next tick.
- If you want to make sure you’re on cycle, pay attention to the back monster’s attack animation and switch prayers as soon as it happens.
Ranger + Blob + Mager
Blob can either be in the middle, the back, or somewhere not within the stack. It cannot be in front of the stack. Do the exact same thing as ranger + mager, but begin a one tick alternation pattern instead of praying only when the mager and the ranger attack. Make sure you alternate correctly, starting with the prayer against the back monster.
Blob Front + Mager + Ranger
Move two tiles north. Stand in the middle. Move out west manually and begin the alternation pattern, praying against the back monster. You’ll have to manually click to attack after moving.
Bat + Ranger + Mager
Move one tile north. Stand in the middle. Move out west manually, praying against the back monster. You’ll have to manually click to attack after moving.
Ranger + Mager + Ranger
This can only happen on wave 65. Move four tiles north. Stand in the middle. Pray range and run out westwards. You will then immediately return to the pillar by running in a diagonal, and wait a single tick. The timing for this is as soon as your character stops moving completely. As soon as that happens, move out once more, running diagonally, and pray mage. The front ranger will attack one tick after the mager, and its attacks will be lined up with the back ranger, making them easy to flick from this point onward.
Ranger – Ranger + Mager
This can only happen on wave 65. Move one tile north. Stand in the middle. Move out west manually, praying against the ranger. Pray mage on the next tick. You’ll have to manually click to attack after moving.
West side of the pillar: If there is a stack on the west side, move out south (as opposed to moving west when there is a stack south of the pillar).
Triple Jads
Triple Jads is just Jad but fast. Before you start the wave, take a moment to stretch your legs. Take a deep breath. I’m not kidding when I say pretty much all Triples deaths happen due to nerves. Relax, stay composed and you’ll be able to pay attention to everything.
 While you’re still paused inside the Inferno, you can brew to 115 and restore. Since Jad’s max hit is 113, you cannot die to a single missed prayer until you’ve been hit by healers. Realistically, it doesn’t make a difference, but the insurance can really help you out psychologically.
 Whether you brew or not, you should now sip your first dose of bastion potion. Make sure you’re standing in the center when you logout for good. You may use the tile marked in the “Preparation” section – it will make it so that only 1 healer from the first Jad attacks you after tagging them.
 When you eventually log back in, you will want to use rigour for the whole wave.
Start by attacking the southern Jad. The most important step of the fight is to identify which Jad attacked last and whether they are attacking in a clockwise or counter clockwise rotation. This is random for each run, but remains the same for the whole wave, so as long as you don’t lose track, you can always expect which Jad will attack next.
These Jads only have 3 healers each. When healers eventually do spawn, remember your priority is always prayers. Only tag a healer when you are absolutely sure you’ve prayed against the Jad attacking you and you will be ready to pray against the next Jad. There is a 3-tick time window in between each attack, so don’t stress over it, you will have time, just stay in the rhythm.
After the first Jad is dead, the wave, ironically, becomes three times easier. You can kill these last two Jads in whichever order you prefer, and you will have plenty of time to brew and restore if you need to. For the last Jad, I would recommend the run-through strategy, so you can barrage up to full HP for the final wave. Once again, you should hit the logout button and take the time to sort out your inventory during the pause. You can get all your mage gear out of the way since you won’t be using it. Make sure you drag all your potions into a manageable position and find a comfortable spot for your blowpipe for when you need to switch.
Tzkal-Zuk
TzKal-Zuk is the final boss of the Inferno. At the beginning of this fight, you will start at the north center of the room. A shield emerges from the wall. This shield protects you from Zuk’s attacks which have a max hit of 251 and cannot be prayed against or tick eaten.
 If you brewed during triple Jads, you may want to sip another dose of bastion potion. If not, you can carry the range boost over. In general, you want to be always potted, so sip after having brewed during the fight. Make sure you leave 2 doses remaining, they will be very important in the later parts of the fight.

 4 Brews + 4 Restores is a comfortable amount to go into the fight with. You can beat Zuk with very minimal supplies, so do not be discouraged if you feel like you are running low, even down to only 1 of each potion.
Zuk Mechanics
- Zuk has 1200 HP.
- The shield has 600 HP.
- It has no defence and cannot be healed – its death means your death.
- A set of mager and ranger will spawn 45 seconds after the start of the fight.
- A following set will spawn 3 minutes and 30 seconds after the previous set spawns. This timer repeats itself.
- The timer is paused when Zuk falls below 600 HP (non-inclusive). The timer is unpaused when Zuk falls below 480 HP (non-inclusive). When the timer is unpaused, an additional 1 minute and 45 seconds are added to the timer. When the timer is unpaused, a single Jad will spawn as well.
- Healers will spawn when Zuk falls below 240 HP (non-inclusive). Zuk also becomes enraged. (edited)
Sets
A set is a spawn of a mager and a ranger, which will always spawn west and east respectively. They have the same properties as the ones found in the waves. The mager cannot revive monsters. They will naturally target the shield, but their aggro will be shifted towards you when you attack them.
Jad
A single Jad spawns in the north-center when Zuk falls below 480 HP. It will naturally target the shield, but its aggro will be shifted towards you when you attack it. It will spawn 3 healers – these always appear north of it.
Healers
Four healers spawn when Zuk falls below 240 HP. They will begin to heal Zuk, but their aggro will be shifted towards you when you attack them. Their attacks are 3×3 tile fireballs that land near them randomly. These attacks cannot be prayed against and each one deals 5-10 damage. After healers spawn, Zuk becomes enraged, meaning he attacks more frequently.
Strategy for Killing Zuk
The tiles marked in the “Preparation” section are safespots. If you are standing on these tiles at the same time the shield is there, you will be safe from every single one of Zuk’s attacks (pre-healers).
 You will want to use Rigour for the near entirety of the fight. Exceptions will be noted. If you are very low on restores, you can flick it at the corner safespots.
  Use your stamina doses when you are between 60-80 run ideally. Try not to fall too low on run energy.
How to Efficiently Attack Zuk: (3-1-1-1-3).
The fight begins – hit him once in the center. Identify which direction the shield is headed towards and move to that corner safespot. Do three hits at the corner. Run to the nearest safespot and do a single hit. Keep running and do another hit somewhere in the middle, in between the two central safespots. Move towards the next safespot for another single shot. Finally, run to the opposite corner and do another three hit
First Set
This will spawn after 2 and a half rotations of the shield (45 seconds). Since the shield may start off by going either west or east, there are different strategies involving each one. These strategies assume you will NOT flick sets. It is both unrealistic and unnecessary to pull it off on a first cape.
West Rotation
 Pray mage. Tag the mager with Tbow ASAP. When the shield reaches the middle, switch to BP and tag the ranger. Move in between each BP hit on the ranger. Stop at the corner. Use BP specs for healing. Brew if you ever fall below 60 HP. Once the shield moves west, follow it and continue attacking until the middle again.
If the ranger is still alive, you will have to wait until the shield travels east again. Make sure to use your brews to tank it. You can also equip your tank armor and shield until you can reach it.
East Rotation
 Pray range. Tag the ranger with BP ASAP. Move in between each BP hit on the ranger. Stop attacking once you reach the middle. Keep moving towards the west corner safespot.
  When you reach it, pray mage and tag the mager. This will prevent a lot of damage taken from the ranger by sacrificing some shield HP. When the shield travels east and reaches the middle again, immediately start attacking the ranger again.
If you are oversupplied with brews (6+), you should tag the mager as early as you can. For either rotation, the goal is to kill the ranger ASAP and keep the mager alive.
Continue attacking Zuk using the method from before – pray mage and ignore the mager. Get Zuk below 600 HP. Afterwards, you can turn off rigour. Kill the mager – the maximum distance you can hit with a Tbow is at the middle-east safespot. You can still attack Zuk at the east corner, but do NOT get Zuk below 480 HP.
Jad
Tag Jad instantly so your shield doesn’t take unnecessary damage. Attack Jad as you would attack Zuk (3-1-1-1-3). Healers will always clump up north of Jad – tag them using blood barrage. Blood barrage counts as a hit, so make sure you move to the next safespot after using it. Do not use blood barrage from the east corner, you will get dragged out. West corner is safe. Prioritize moving to the next safespot and overhead prayers before anything else.
After killing Jad, return to attacking Zuk. Do NOT get Zuk below 240 HP. Once you can no longer attack Zuk, patiently follow the shield until the second set spawns.
Second Set

 Tag and pray against the monster that spawns closest to you.
  Make sure to pray mage by the time you tag the mager. Kill the ranger as you did before. Leave the mager alive.
  Brew up to 115 HP afterwards.
  You will now use the first of the two remaining bastion doses. Return to attacking Zuk, but only do your 3 hits at the corners. Get Zuk under 240 HP – prepare to equip BP for healers.
Healers
- Prioritize being on pace with the shield at all times.
- Tag healers with BP when they spawn.
- Move in between each BP hit on the healers to ensure you’re caught up with the shield.
- Try to tag the next healer ASAP – the goal is to get them all off of Zuk.
- You can move further into the corner than the corner safespot to dodge fireballs.
- Use BP specs to heal.
 Start brewing as soon as you fall below 40 HP.
- Kill all the healers.
Enraged Phase
Enrage starts when healers spawn. The 3-1-1-1-3 method is no longer viable, neither are the middle safespots. Corners are still safe. Stay slightly in front, or in the middle of the shield at all times. Never stay near the back. Do not attack Zuk in between corner safespots and the middle safespots (which are no longer safe) – you will get dragged out in either direction.
After all healers are dead, follow the instructions above to continue attacking Zuk. This is the final stretch. Brew up – don’t be afraid to use all of them. Use your final dose of bastion potion here. If you can’t deal enough DPS to finish off Zuk, you may encounter a third set. At Which point proceed to deal with it similarly to the previous sets, but do not kill the mager after the ranger is dead. After doing so, finish of Zuk and congratulations on your Infernal Cape.
Inferno FAQs
Here are some of the most frequently asked questions regarding the Inferno to summarise this guide.
Can you do the inferno without prayer flicking?
Yes, it is possible to do the inferno with no prayer flicking at all. Special attacks such as the sgs and eldritch can provide a theoretical endless supply of prayer points. However, it is recommended to know how to lazy flick as a minimum as it will save time. Being reliant on waiting for special attacks is a waste of time.
Is inferno a safe minigame?
Yes, hardcore ironmen can die freely in the inferno and not lose their hardcore status.
How hard is the inferno?
The inferno is undoubtably one of OSRS’s most difficult pieces of PvM content. However, there are currently over 50,000 accounts that have completed the inferno. Making it a very achievable goal for people of all levels.
How long does it take to beat the Inferno?
On average, for most players it will take between 30 and 50 attempts (around 30 hours). However, many players have been able to beat it in less than 10 attempts. With others taking up to or more than 100. It varies from person to person.
Are inferno spawns random?
Yes, at the start of each wave the spawns are completely randomized.

 Attacks with melee, hence its name.